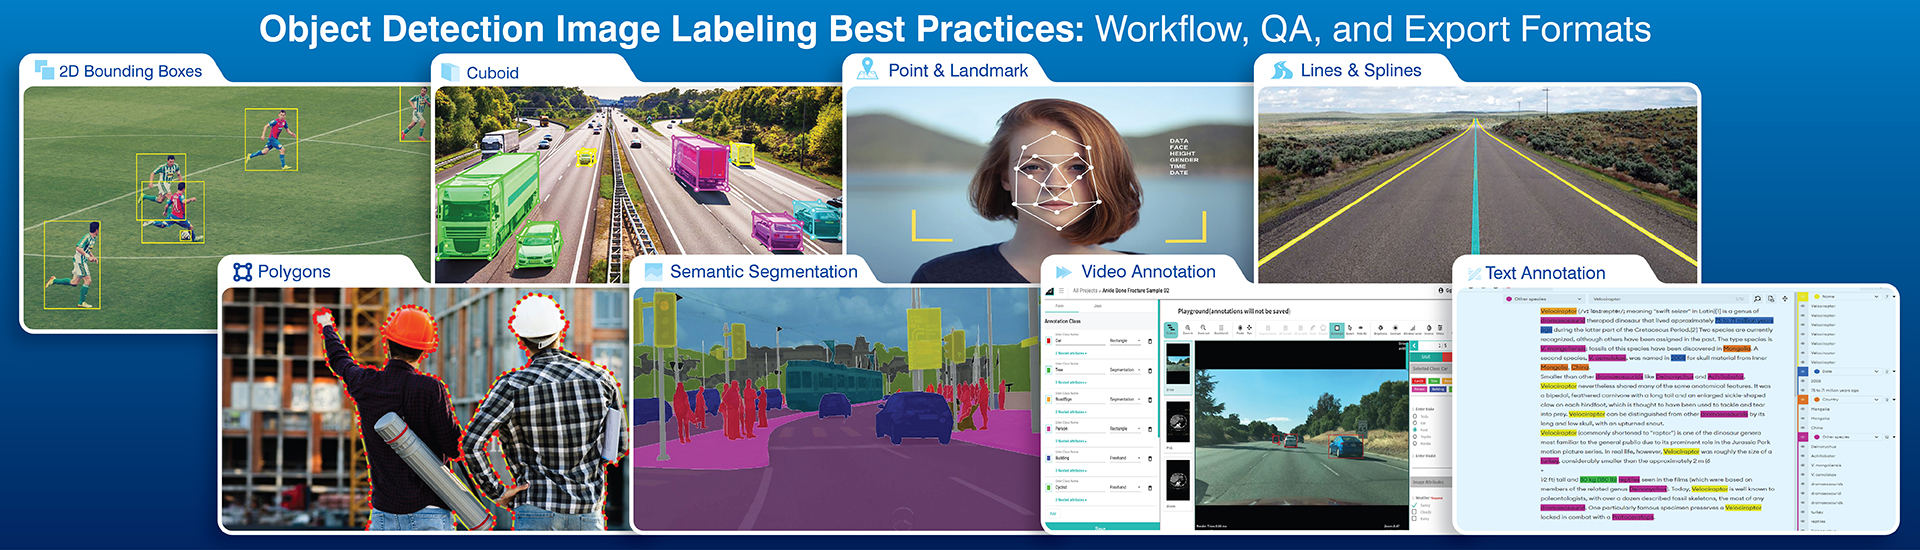
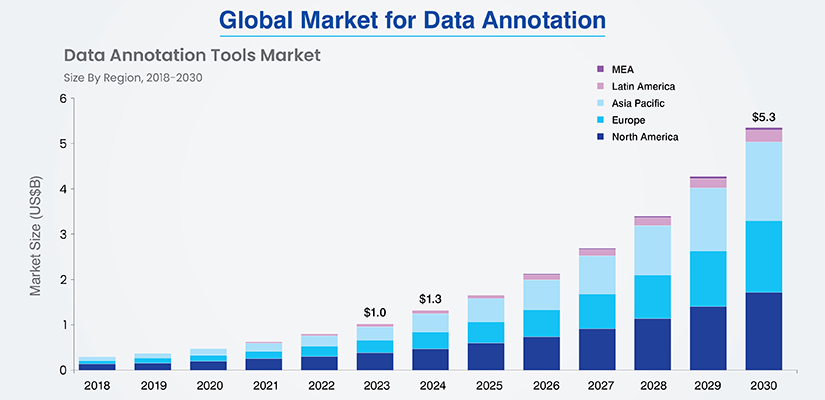
Models trained using supervised object detection methods are trained using annotated example images. When the images are properly and consistently annotated, the model can learn the appropriate visual features necessary for detecting objects in images. But when the labels associated with the images begin to "drift", the model begins to absorb that drift and users eventually see that drift manifesting in lower precision, lower recall and ultimately a decline in mean Average Precision (MAP).Image labeling associated with object detection is a crucial component of successful deployment of these systems in a wide variety of applications including autonomous vehicles, retail analytics, medical imaging and video surveillance. As a result, many organizations rely on specialized image labeling services to ensure accuracy, consistency, and scalability across training datasets.The growing market for image annotation tools also indicates how dependent teams are on the image labeling component of the overall system. Grand View Research estimates that the global market for data annotation tools will reach $1.02 billion in 2023 and $5.33 billion by 2030, representing approximately 26% CAGR.
Here we've given an overview of how image annotation is done to train object detection systems, from preparing the dataset to exporting formats. But before getting into image annotation techniques, it's important to understand how object detection models use this annotated data.
Understanding object detection model requirements
There are many differences between object detection and image classification. For example, object detection localizes each instance of an object within the image, rather than simply assigning a single label to the entire image. Similarly, segmentation goes beyond localization and assigns labels to each pixel in an image. Detection sits somewhere in the middle, requiring both localization and assignment of a class label to each instance of an object.Most pipelines expect three basics:
- Bounding box coordinates for each instance
- Class labels mapped to a fixed index list
- Image metadata that stays consistent across image files and label files
Although different model families may store the expected data differently, all object detection models are based upon the same fundamental components, which include both the location and class of each object.YOLO style detectors typically read from normalized coordinate pairs stored in text files associated with each image, which are expressed as x-center, y-center, width and height in the range [0-1].Two-stage detectors such as Faster R-CNN also read from boxes and classes, but ingest data from formats such as COCO JSON or VOC XML during training and generate region proposals.SSD-style models also rely upon multiscale boxes and benefit from consistent box tightness throughout the dataset.Granularity Matters. Labeling an object as "car" instead of "vehicle", or drawing loose boxes for half of the dataset, causes the model to learn mixed rules.Once you understand what the model needs, you can choose the correct annotation method.
Choosing the right annotation type for object detection
For most object detection tasks, bounding boxes are preferred annotation type due to the balance between effort and the amount of information provided to the model during training.
Axis-aligned vs. rotated boxes
- Axis-aligned boxes work for people, products, vehicles, animals, and most retail and street scenes.
- Rotated boxes help in aerial imagery, documents, PCB inspection, and any case where orientation carries meaning.
When polygons or instance segmentation make more sense
While polygon or mask annotations provide the ability to capture precise shapes (such as surgical tools against complex backgrounds, defects in surface texture or tumor outlines), they require more time to create. 1 study reported an average time of 94 seconds to create a mask annotation compared to 26 seconds for a bounding box annotation in a small test.
Handling edge cases
Teams working on object detection will encounter:
- Occlusion: Label the visible portion of the object and create an "occluded" attribute if supported by the file format.
- Truncation: Mark an object "truncated" if part of it's outside the frame. CVAT's VOC export handles attributes like occluded and truncated for this need.
- Overlap: Annotate each instance individually, regardless of overlapping boxes.
Class taxonomy and consistency
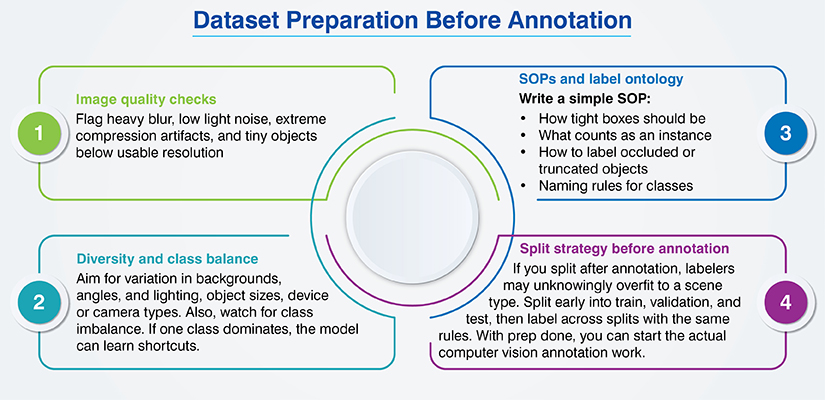
To prevent ambiguity in your label ontology, define it clearly before you begin:
- Singular vs. Plural Labels
- Person vs. Pedestrian
- Truck vs. Lorry vs. Van
Lock down your ontology definition once defined.
Step-by-Step image annotation workflow for object detection
Annotated image workflow for object detection, step by step, that's what you need. The 5 steps outlined below are the "quality filters" for your annotated data when developing an object detection image labeling process. These make sure consistency in your image labeling between different users, across multiple batches and across various times.
Step 1: Choose your tool
There are several common tools we use to do image annotation, including
- CVAT: ideal for teams that require review workflows and support a variety of export formats.
- LabelImg: provides quick box labeling capabilities, can save VOC XML files and has been tested for use with YOLO.
- Vendor-provided platform tools: if you require managed Quality Assurance and Throughput.
Step 2: Apply consistent rules for box placement
Tight boxes help to avoid "noise" found in loose box placement and improve model performance. Tight boxes refer to:
- Boxes following the visible boundaries of the object.
- Minimal background padding.
- Consistent treatment of shadows and reflections.
Step 3: Label class correctly
It may seem obvious but it's here where most "drift" begins.
- Use a locked class list.
- Avoid "Misc", unless it's truly needed.
- Include a brief note within your SOPs for confusing pairs (Dog vs Wolf, Sedan vs Hatchback).
Step 4: Handling small objects, partially visible objects, and dense scenes
Zoom in to handle small objects to the best of your ability with accuracy based upon your resolution. Label what you can see and then label "Truncation/Occlusion". Turn on "Snap to Edges" if available and depend on second-pass review for dense scenes.
Step 5: Managing versions and iterations
Your labeling's bound to change over time. So keep track of:
- Dataset Versions
- Label Schema Versions
- Guideline Versions to enable reproducible training runs.
Quality assurance and validation in image annotation
Object detection model “mystery bugs” are caused by annotation errors. The most common types include:
- Mislabeling: incorrect class or name inconsistencies
- Inconsistent box placement: tight/loose
- Missing objects: unlabeled instances result in teaching the model that objects can be ignored
Label noise is prevalent in real world datasets. According to a 2024 study regarding label noise in object detection, estimated real world corruption rates were cited as being in the 8.0% to 38.5% range and demonstrated the impact that increasing levels of noise have on degradation of detection models.Some practical QA methods include:
- Inter-annotator checks: 2 labelers provide labels for the same image; then you compare the results and resolve any discrepancies.
- Gold set: A small, thoroughly reviewed subset should be maintained as a benchmark.
- Script validation: Impossible boxes, invalid class IDs, empty labels or out of range coordinates need to be identified.
- Visual spot checks: A quick visual review by a reviewer after each batch.
Feedback Loops Matter. Fix the guideline and then re-review the next batch, rather than "fixing it later". Following QA, align the exported format to match the training pipeline.
Exporting and formatting annotations for model training
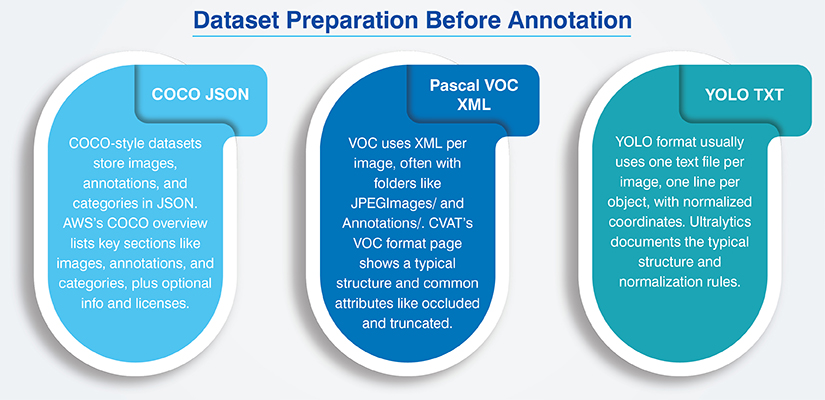
Quick comparison table of the formats

As a rule, do a small export, train a quick baseline, and confirm the pipeline reads labels correctly before you export the full dataset.
Scaling image annotation for large object detection datasets
Manual labeling doesn't scale in a linear manner. Humans get tired, rules get drifted and reviews get skipped.Almost all teams go through the 3 stages:
- Manual: Manual labeling's good for early prototype development and for refining guidelines.
- Semi-Automated: You label a small initial seed set, train a weak model and then allow it to generate proposals for humans to correct. This can significantly speed up the time required for labeling. A study conducted in 2018 found each manual box labeling took an average 10.15 seconds compared to 5.20 seconds per correction in their environment. A CVPR study done the same year also found an average labeling time of 30 seconds per box, showing that the time to label can widely vary based on the interface and constraints.
- AI-Assisted with Human-In-The-Loop: This approach means that the model continues to suggest, humans verify and correct and you continue to retrain in cycles.
Active learning can also help reduce work by picking the most informative images first. A team studying Active Learning in Agriculture had reported in 2022 that active learning helped save almost 50% time spent annotating images.Scaling also demands clear operational foundations:
- Access Control and Audit Logs
- Consistent Storage and Naming
- Review Queues and Sampling Plans
- Clear Definition Of "Done"
For many teams, this encourages them to seek external assistance.
Why outsourcing image annotation improves object detection outcomes
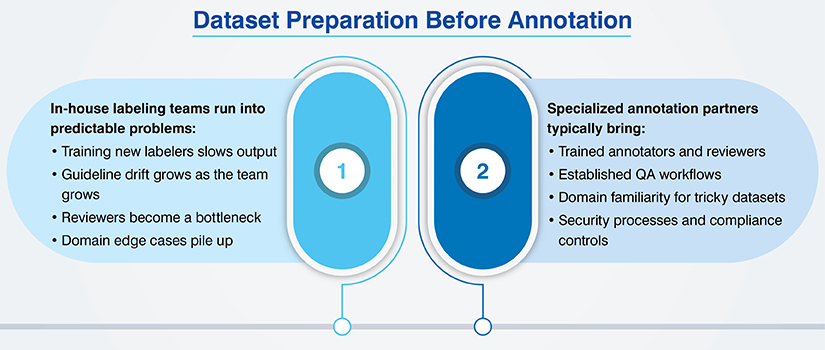
If you aim to ship a model, the key benefit is speed with stability. You get consistent image labeling for machine learning without constantly rebuilding the process.
Conclusion
Whether your image annotation for object detection is effective in training your model shows up in the field and its quality can't be hidden. This is why you must define the labeling ontology early, establish consistency and run QA as a non-negotiable gate. Treat labeling as a component of model engineering and export in a format the model expectations. So, it's smart to use AI-assisted review loops and a specialist annotation team like HitechDigital if you want to speed up labeling while preventing quality drift.